


Extrusive luxation
Extrusive luxation
Extrusive luxation or extrusion is partial displacement of a tooth out of the socket in an axial direction.
Clinical findings
An extruded tooth may:
Appear longer than the adjacent teeth
Be mobile
Prevent the patient occluding fully.

Illustration: Longitudinal section of a tooth showing an extrusive luxation injury.

Clinical image: Labial view showing extrusion of UL1 − note the change in the incisal edge of the UL1 compared to the UR1.
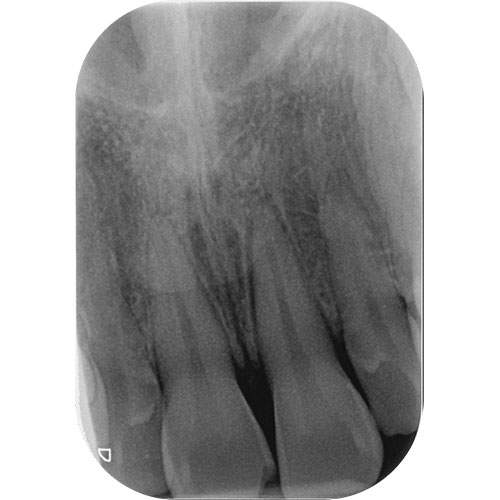
Radiograph: Extruded UL1 showing an increase in the periodontal ligament space.
Radiographic findings
An extruded tooth will show:
Varying degrees of widening of the periodontal ligament (depending on the degree of extrusion)
An increase in the width of the periodontal ligament space or in severe cases the whole apical socket outline may be visible.
Management of primary teeth
Mild extrusion (< 3mm) can either be repositioned (but being mindful of the position of the erupting successor) or left to reposition itself over time
For severe extrusion (> 3mm) repositioning or extraction of the extruded tooth can be carried out (this will depend on how soon the successor is to erupting). Extraction may be under local anaesthetic or if this is not possible refer to a maxillofacial unit for extraction under GA.
Management of permanent teeth
Digitally reposition the extruded tooth under local anaesthetic
Check the occlusion
Splint the tooth temporarily
Take a radiograph to make sure that the tooth is fully repositioned
Once it is confirmed that the tooth is in the correct position – a flexible splint should be applied
Advise the patient to return to normal tooth brushing as soon as possible (if there are extensive soft tissue injuries diluted chlorhexidine mouthwash can be advised for a few days)
Monitor the pulpal health at subsequent follow-up appointments and a follow-up period of 5 years is advised
Tooth discolouration soon after the injury may be transient. Patients should therefore be reassured and no diagnosis of necrosis made in the absence of any other signs or symptoms (particularly within the first three months after the injury).
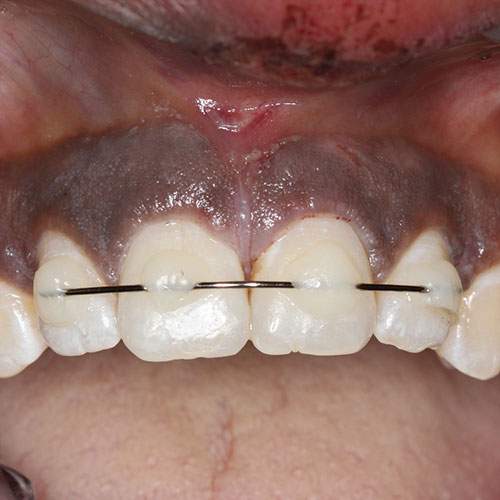
Clinical image: Labial view of the case above after the UL1 has been repositioned and splinted.
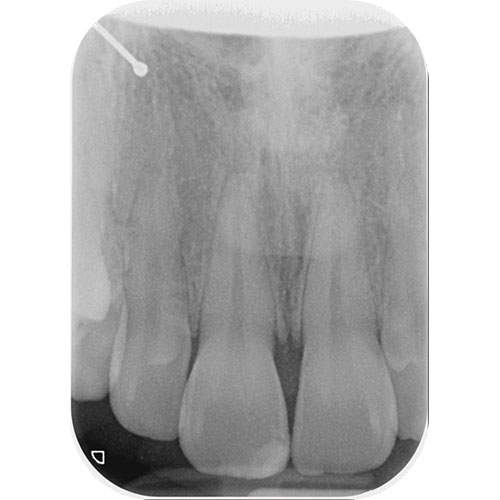
Radiograph: Check UL1 after digital repositioning of the extruded tooth.

When attempting to reposition the tooth a useful tip is to use a forward and back watch-winding motion – this helps to push past any immature clot that may have formed.
Alternatively ask the patient to bite down on a cotton wool roll to aid repositioning.
To check the tooth is fully seated, ask the patient to bite together and check that there are contacts between the posterior teeth.
– Ms Serpil Djemal
Splinting
IS IT NECESSARY?
Yes splinting is necessary for cases of extrusive luxation.
Splint the tooth temporarily and then ensure that the tooth has been repositioned correctly by taking a radiograph.
Then apply a flexible splint.
SPLINTING TIME
The recommended time for splinting in extrusive luxation is 2 weeks.
WHAT MATERIALS TO USE?
Several different materials are available for splinting a 0.016″ stainless steel orthodontic wire with composite resin.
This should be extended to one uninjured tooth either side of the injured teeth.
Monitoring: The pulpal response should be monitored at subsequent appointments and a follow-up period of 5 years is advised.